[vimeo 71163895 w=500 h=275]
A video of the interface in action!
This is a simple tutorial on how to use the application and make Pinguino and Pure data talk to each other in real time. The application files are attached in the zip file below. A detailed description of the project can be found in this page.
IO_PureData_Pinguino_V_1_2.zip
With these files you can control the Microcontroller from Pure Data in real time, set the Digital pins to High and Low levels, as well as read them when Inputs, use the PWM based Analogue Outputs, and read the Analogue Inputs from the ADC module included in the PIC.
In specific, this application works for PINGUINO PIC32 OTG.
The communication protocol takes as inspiration Firmata and uses the MIDI message protocol to send instructions to the PIC, in order to chante Pin values and states, as well as report back the current state of Digital Inputs, Digital Outputs, Analogue Inputs and Analogue Outputs.
All you need to do is include the file with the extension .pdl32 in the folder with the same name, found in p32/ and the source file with the extension .c in p32/include/pinguino/core on the IDE directories.
I’ve also included a .pde application (io_PureData_Control.pde) that uses two main functions of this library:
PureData.init(), which initializes the necessary ports and pins to work with Pure Data; and
PureData.communicate(char inputData[3], char Dgtl[22], long int Anlg[8]): this function returns the lenght of the read data, which is stored in inputData. It also fills the Dgtl and Anlg arrays with the current values of the pins and sends this information over the USB.
To use the USB with a PC, I downloaded and installed a driver called CDC RS-232 EMULATION DEMO here. It is a one minute process really.
Finally, in the .zip there are the Pure Data files that communicate with a Pinguino PIC32 OTG programmed with this pde I have just mentioned.
The Pure Data interface looks like this:
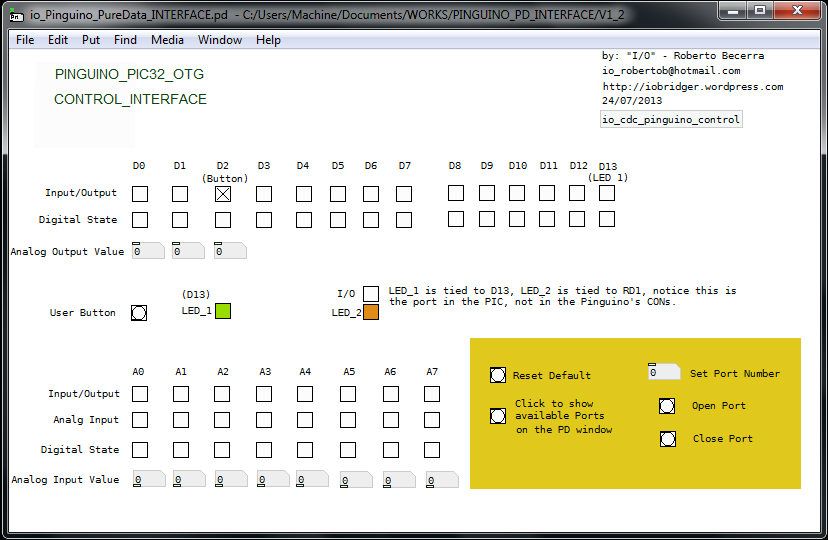
To control the Pinguino board with PD:
1- Connect Pinguino via USB to the computer (RS 323 has to be installed if you don’t have a COM Port)
2- Open io_Pinguino_PureData_INTERFACE.pd with Pure Data.
3- In io_Pinguino_PureData_INTERFACE.pd click on “Click to show available Ports on the PD window” to find out which ports are available and your Pinguino is hooked up to.
4- Finally, take the number of that Port, write it on the number box “Set Port Number” and click on the bang button “Open Port”, and voilà! You can now control states and pin modes in real time from Pure data.
If you could not connect or there are no COM ports available, reset your PIC and try again.
Please help abusing this project, to improve it and find all its faults.
1 thought on “Tutorial – Pinguino & Pure Data Interface”
Comments are closed.